Ankit_Add

Friday, March 9, 2018

Page Object Model - Selenium WebDriver

What is POM?


  • Page Object Model is a design pattern to create Object Repository for web UI elements.
  • Under this model, for each web page in the application, there should be corresponding page class.
  • This Page class will find the WebElements of that web page and also contains Page methods which perform operations on those WebElements.
  • Name of these methods should be given as per the task they are performing, i.e., if a loader is waiting for the payment gateway to appear, POM method name can be waitForPaymentScreenDisplay().

Advantages of POM

  1. Page Object Patten says operations and flows in the UI should be separated from verification. This concept makes our code cleaner and easy to understand.
  2. The Second benefit is the object repository is independent of test cases, so we can use the same object repository for a different purpose with different tools. For example, we can integrate POM with TestNG/JUnit for functional Testing and at the same time with JBehave/Cucumber for acceptance testing.
  3. Code becomes less and optimized because of the reusable page methods in the POM classes.
  4. Methods get more realistic names which can be easily mapped with the operation happening in UI. i.e. if after clicking on the button we land on the home page, the method name will be like 'gotoHomePage()'.

Assume that in our application we have a login page which offers regular log in functionality. We can create a page object for login page that will represent all login methods as actions, Web page looks like below where the constructor is accepting the WebDriver instance.
import org.openqa.selenium.WebDriver;

public class LoginPage {
    private WebDriver driver;

    public LoginPage(WebDriver driver) {
        this.driver = driver;
    }
}
Now after making our basic Page model for login and initializing the constructor which is accepting the WebDriver instance and we can start adding our methods which will serve as functionalities our login page offers. Our login page contains a login method which returns us the Home Page after login. ###LoginPage
import org.openqa.selenium.By;
import org.openqa.selenium.WebDriver;

public class LoginPage {

    private WebDriver driver;

    private static final String LOGIN_PAGE_URL = "https://www.facebook.com/";
    private static final By USERNAME_INPUT = By.name("email");
    private static final By PASSWORD_INPUT = By.name("pass");
    private static final By LOG_IN_BUTTON = By.id("loginbutton");

    public LoginPage(WebDriver driver) {
        this.driver = driver;
    }

    public LoginPage open() {
        driver.get(LOGIN_PAGE_URL);
        return this;
    }

    public HomePage loginAs(String username, String password) {
        driver.findElement(USERNAME_INPUT).sendKeys(username);
        driver.findElement(PASSWORD_INPUT).sendKeys(password);
        driver.findElement(LOG_IN_BUTTON).click();

        return new HomePage(driver);
    }
}
###HomePage
import org.openqa.selenium.WebDriver;

public class HomePage {
    private WebDriver driver;

    public HomePage(WebDriver driver) {
        this.driver = driver;
    }
}

Why should we use page objects?

They reduce the amount of duplicated code. If there is some change in the website or mobile User interface, in the perfect situation we need to apply the fix in only one place. Page objects increase code readable because they make the test easier to understand. They hide the details of the UI structure from the tests so we can clearly see the logic and the intention of the test. So, The public methods represent the services that the page offers and Page objects shouldn’t expose the internals of the page.

How to Use Page Object Class in Test

With Page Object our test are able to log in without worrying how the steps and functionality is implemented because it shouldn’t matter to the test. So lets create a simple implementation of our Login Page in our Test.
import java.util.concurrent.TimeUnit;
import org.openqa.selenium.WebDriver;
import org.openqa.selenium.chrome.ChromeDriver;
import org.testng.annotations.BeforeClass;
import org.testng.annotations.Test;

public class LoginTest {

    private WebDriver driver;
    private HomePage homePage;

    @BeforeClass(alwaysRun = true)
    public void setUp() {
        driver = new ChromeDriver();
        driver.manage().timeouts().implicitlyWait(10, TimeUnit.SECONDS);
    }

    @Test(description = "Open Facebook Page and Login with username and password")
    public void loginFacebookTest() {

        LoginPage loginPage = new LoginPage(driver);
        homePage = loginPage.open().loginAs("username", "password");
    }
}
Tuesday, February 13, 2018

RESTful Java client with Apache HttpClient for Post

Apache HttpClient is a robust and complete solution Java library to perform HTTP operations, including RESTful service. In this tutorial, we show you how to create a RESTful Java client with Apache HttpClient, to perform a  “POST” request.


Post Apache HttpClient

Apache HttpClient is available in Maven central repository, just declares it in your Maven pom.xml file.
File : pom.xml
<dependency>
 <groupId>org.apache.httpcomponents</groupId>
 <artifactId>httpclient</artifactId>
 <version>4.1.1</version>
</dependency>
Apache HttpClient to send a “POST” request.
import java.io.BufferedReader;
import java.io.IOException;
import java.io.InputStreamReader;
import java.net.MalformedURLException;
import org.apache.http.HttpResponse;
import org.apache.http.client.methods.HttpPost;
import org.apache.http.entity.StringEntity;
import org.apache.http.impl.client.DefaultHttpClient;

public class ApacheHttpClientPost {

 public static void main(String[] args) {

   try {

  DefaultHttpClient httpClient = new DefaultHttpClient();
  HttpPost postRequest = new HttpPost(
   "http://localhost:8080-------------Restful API");

  StringEntity input = new StringEntity("{\"qty\":200,\"name\":\"item\"}");
  input.setContentType("application/json");
  postRequest.setEntity(input);

  HttpResponse response = httpClient.execute(postRequest);

  if (response.getStatusLine().getStatusCode() != 201) {
   throw new RuntimeException("Failed : HTTP error code : "
    + response.getStatusLine().getStatusCode());
  }

  BufferedReader br = new BufferedReader(
                        new InputStreamReader((response.getEntity().getContent())));

  String output;
  System.out.println("Output from Server .... \n");
  while ((output = br.readLine()) != null) {
   System.out.println(output);
  }

  httpClient.getConnectionManager().shutdown();

   } catch (MalformedURLException e) {

  e.printStackTrace();

   } catch (IOException e) {

  e.printStackTrace();

   }

 }

}


Friday, February 9, 2018

Setup Selenium WebDriver Grid with Docker

Integration tests are an integral part of any modern web application, you’ll likely be running selenium tests. While Selenium tests are easy to write and execute on your local workstation. Now you’re stuck with two bad options like SaaS provider like SauceLabs and BrowserStack etc. or running your own Selenium Grid and managing a multitude of machines and browser versions. This is going to make you CI process with slow builds.
In this article, you’ll see how easy it is to set up a Selenium Grid with Docker, how easy it is to maintain, and how to extend and grow your Selenium grid to satisfy your team’s needs.

Challenges :

If you use Selenium Grid for running you test, You must have to install so many configurations and tools on each machine which your test depends on like Java, Selenium WebDriver, Test Browsers, VNC etc. Maintaining machines in grid are sometimes costly and time consuming to maintain.

Why Docker :

With containerized test executors, the test suites can be executed on any platforms without library dependencies. Selenium Grid is distributed system of nodes for running tests. Instead of running your grid across multiple virtual machines, using Docker we can run them all Test’s parallel and fast on a single large machine using Docker.

Selenium Grid Hub and Nodes in Docker :

To set up Selenium WebDriver Grid we need to download a couple of Selenium Images step by step:

#Step 1: Download Selenium/hub

Use docker pull command to download the Selenium/hub
docker pull selenium/hub
docker-pull-selenium-hub

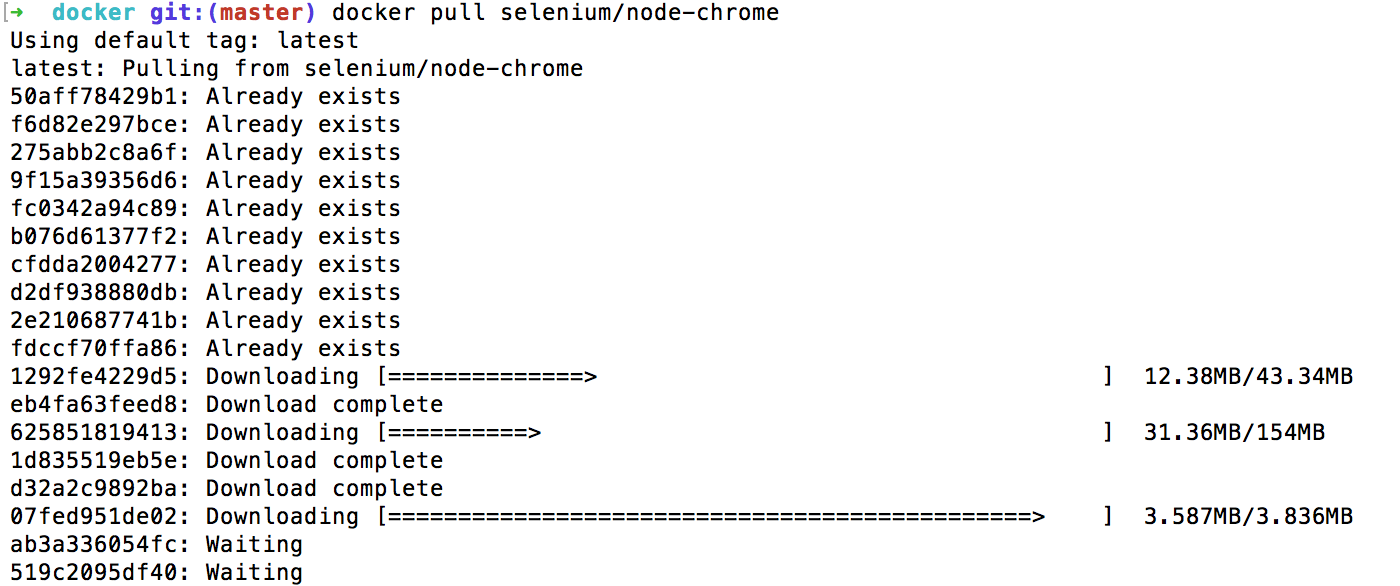
#Step 2: Download Selenium/node-chrome

Use docker pull command to download the Selenium/node-chrome, Chrome browser image.
docker pull selenium/node-chrome
docker-pull-selenium-chrome-node

#Step 3: Download Selenium/node-firefox

Same like above use docker pull command to download the Selenium/node-firefox, Firefox browser image.
docker pull selenium/node-firefox

#Step 4: Check Docker Image after Download

After downloading the images we can check the downloaded Images using the docker command and see all the images on the list.
docker images
docker-images-command-list-selenium

#Step 5: Start Selenium Hub

As we have downloaded the images and we can now start the Selenium Hub. So the process is generally starting Hub first and then joining other nodes to the Hub.
docker run -d -p 4444:4444 -P --name selenium-hub selenium/hub
Run docker ps to check the container detailsdcoker-ps-selenium-hub-start
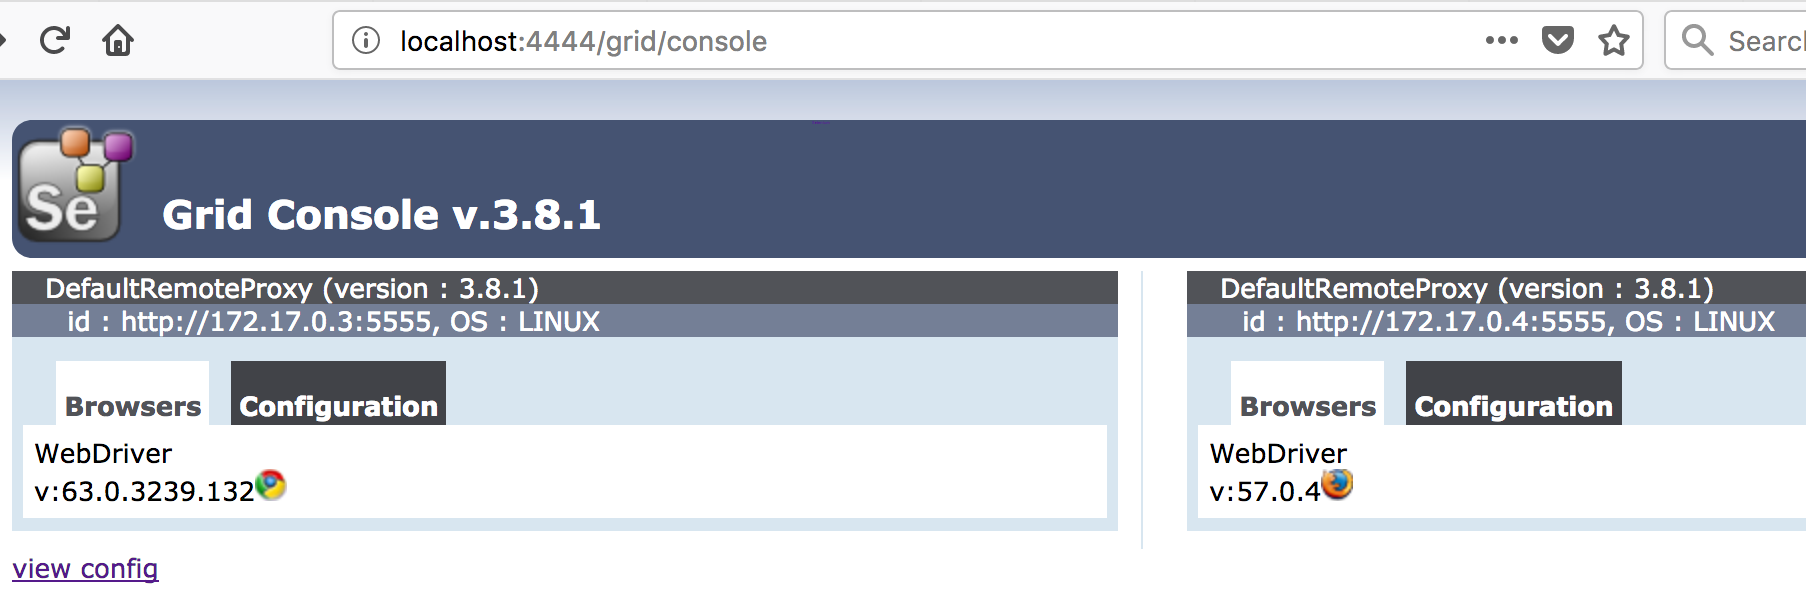
After that we can verify that selenium grid is running or not by navigating to the URL:
http://localhost:4444/grid/console
grid-console-browser-selenium-hub

#Step 5: Start Selenium Node

As the Hub is started and listening on Port No:4444 we are ready to start nodes and connect with Selenium Hub.
docker run -d --link selenium-hub:hub -P --name chrome selenium/node-chrome
docker run -d --link selenium-hub:hub -P --name firefox selenium/node-firefox
Verify Nodes in Browser Console:

#Step 6: Run Test on Chrome:

All our Test should be pointing to the URL: http://localhost:4444/wd/hub
As the Hub is running on port:4444, so we will direct all the test on this port and Hub will work as load balancing and redirecting the request to proper browser and node.
import java.net.URL;
import org.openqa.selenium.WebDriver;
import org.openqa.selenium.remote.DesiredCapabilities;
import org.openqa.selenium.remote.RemoteWebDriver;
import org.testng.annotations.Test;

public class RunningTestOnDocker {

    @Test
    public void runTestOnDocker() throws Exception {
        DesiredCapabilities dcap = DesiredCapabilities.chrome();
        String driverPath = System.getProperty("user.dir") + "/exe/chromedriver";
        System.setProperty("webdriver.chrome.driver", driverPath);

        // Hub Port at 4444
        URL gamelan = new URL("http://localhost:4444/wd/hub");
        WebDriver driver = new RemoteWebDriver(gamelan, dcap);
        // Get URL
        driver.get("https://www.google.com/");
        // Print Title
        System.out.println(driver.getTitle());
    }
}

Output:

Google
As we are using the Chrome Browser and running a simple Test which is to open Google.com and print the website title. You can also create a simple Test in Firefox and run the both Test parallel.
You can use the selenium/node-chrome-debug as a debug image because It is bundled with realVNC and you can see the Browser and test at run time. You can read articles about debugging container Images with realVNC here.

How to use Dependencies in TestNG?

Sometimes we have steps or tests which are depended on each other and can not be performed alone. For example: To update Facebook account details, User should be logged in already.I personally do not recommend making test cases dependent upon each other and should be independent.
To make dependencies between test, TestNG provides dependsOnMethods or dependsOnGroups attributes which can be used in the @Test. As per the TestNg documentation, there are two types of dependencies:
  • Hard dependencies: If a dependent method failed, all the test methods will be skipped (not failed)
  • Soft dependencies: Run all the methods even if the dependent methods failed. To make soft dependencies in our test we have to use «alwaysRun=true» in your @Test.
Let’s see some working examples to understand the concept:

#dependsOnMethods

Let’s make two @test methods where the second method depends on the first method.
secondTestMethod() is declared as independent on method firstTestMethod(), which guarantees that firstTestMethod() will always be invoked first.
package com.tutorial.testng.dependencies;

import org.testng.annotations.Test;

public class DependsOnMethodsTest {

    @Test()
    public void firstTestMethod() {
        System.out.println("First test method");
    }

    @Test(dependsOnMethods = { "firstTestMethod" })
    public void secondTestMethod() {
        System.out.println("Second test method");
    }
}

Output:

dependsOnMethods-testng-result
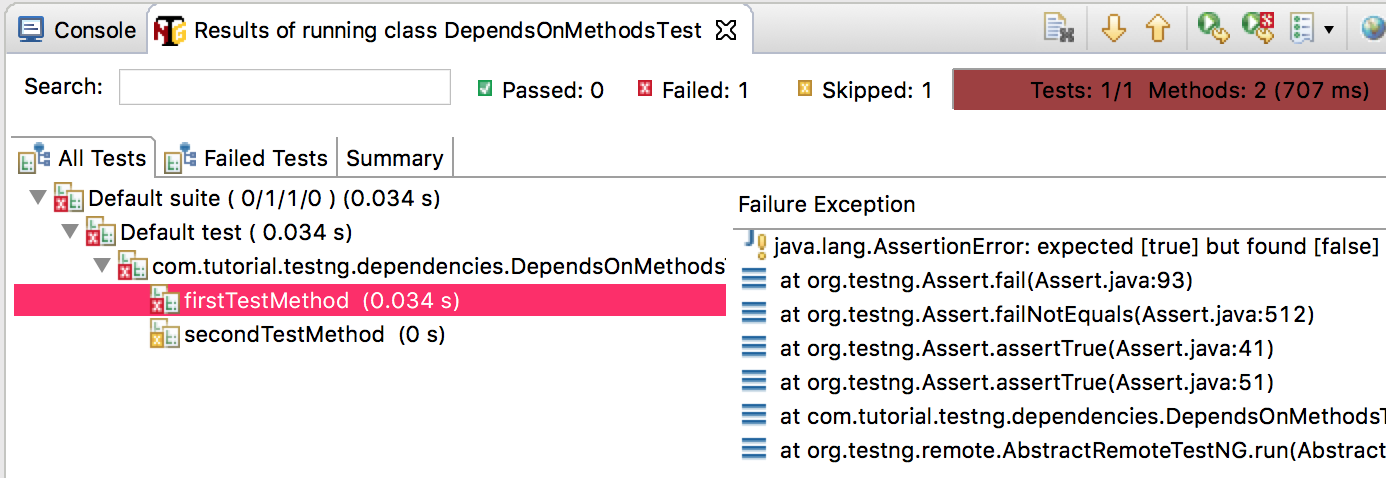
Let’s change our test class and make the dependent method firstTestMethod() failed. Now in results dependent method firstTestMethod() should be FAILED but our method secondTestMethod() should be SKIPPED.
package com.tutorial.testng.dependencies;

import org.testng.Assert;
import org.testng.annotations.Test;

public class DependsOnMethodsTest {

    @Test()
    public void firstTestMethod() {
        System.out.println("First test method");
        Assert.assertTrue(false);
    }

    @Test(dependsOnMethods = { "firstTestMethod" })
    public void secondTestMethod() {
        System.out.println("Second test method");
    }
}

Output:

dependsOnMethods-failure-testng-result

How to use ‘alwaysRun’ and make Soft dependencies:

Let’s change our test class again and add alwaysRun = true in the second method. Now in results dependent method firstTestMethod() should be FAILED but our method secondTestMethod() should be Running and PASSED.
alwaysRun attribute is a boolean type, so only accepted values are true and false.
package com.tutorial.testng.dependencies;

import org.testng.Assert;
import org.testng.annotations.Test;

public class DependsOnMethodsTest {

    @Test()
    public void firstTestMethod() {
        System.out.println("First test method");
        Assert.assertTrue(false);
    }

    @Test(dependsOnMethods = { "firstTestMethod" }, alwaysRun = true)
    public void secondTestMethod() {
        System.out.println("Second test method");
    }
}

Output:

dependsOnMethod-with-alwaysRun-testng

#dependsOnGroups

We have two test methods which are part of a Group and TestMethodDependOnGroup() is dependent on the group testGroup itself. So If any of the tests failed from the group, all the @test dependent on the group would be SKIPPED.
package com.tutorial.testng.dependencies;

import org.testng.annotations.Test;

public class DependsOnGroupsTest {

    @Test(groups = { "testGroup" })
    public void firstGroupMethod() {
        System.out.println("First Group method");
    }

    @Test(groups = { "testGroup" })
    public void secondGroupMethod() {
        System.out.println("Second Group method");
    }

    @Test(dependsOnGroups = { "testGroup" })
    public void TestMethodDependOnGroup() {
        System.out.println("test method depending on group");
    }
}

Output:

dependsOnGroup-testng-result
Let’s change above class and mark one test method from the group as Failed and our dependent method TestMethodDependOnGroup() should be marked as SKIPPED.
package com.tutorial.testng.dependencies;

import org.testng.Assert;
import org.testng.annotations.Test;

public class DependsOnGroupsTest {

    @Test(groups = { "testGroup" })
    public void firstGroupMethod() {
        System.out.println("First Group method");
    }

    @Test(groups = { "testGroup" })
    public void secondGroupMethod() {
        System.out.println("First Group method");
        Assert.assertTrue(false);
    }

    @Test(dependsOnGroups = { "testGroup" })
    public void TestMethodDependOnGroup() {
        System.out.println("test method depending on group");
    }
}

Output:

dependsOnGroup-failed-test-result