Ankit_Add

Tuesday, January 30, 2018

Getting started with Selenium Grid

Selenium Grid is a tool that distributes the tests across multiple physical or virtual machines so that we can execute scripts in parallel (simultaneously). It dramatically accelerates the testing process across browsers and across platforms by giving us quick and accurate feedback.
Selenium Grid allows us to execute multiple instances of WebDriver or Selenium Remote Control tests in parallel which uses the same code base, hence the code need NOT be present on the system they execute. The selenium-server-standalone package includes Hub, WebDriver, and Selenium RC to execute the scripts in grid.
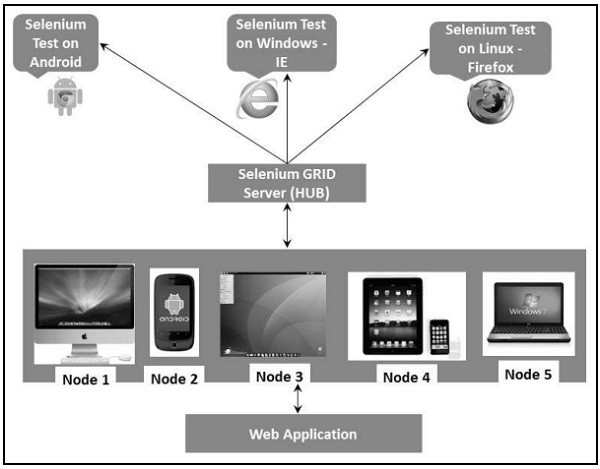
Selenium Grid has a Hub and a Node.
  • Hub − The hub can also be understood as a server which acts as the central point where the tests would be triggered. A Selenium Grid has only one Hub and it is launched on a single machine once.
  • Node − Nodes are the Selenium instances that are attached to the Hub which execute the tests. There can be one or more nodes in a grid which can be of any OS and can contain any of the Selenium supported browsers.

Architecture

The following diagram shows the architecture of Selenium Grid.
selenium_ide_121

Working with Grid

In order to work with the Grid, we need to follow certain protocols. Listen below are the major steps involved in this process −
  • Configuring the Hub
  • Configuring the Nodes
  • Develop the Script and Prepare the XML File
  • Test Execution
  • Result Analysis
Let us discuss each of these steps in detail.

Configuring the Hub

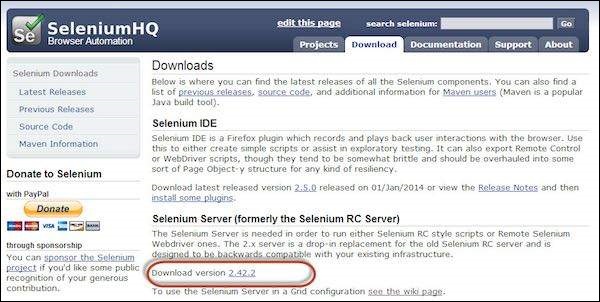
Step 1 − Download the latest Selenium Server standalone JAR file from http://docs.seleniumhq.org/download/. Download it by clicking on the version as shown below.
selenium_ide_45
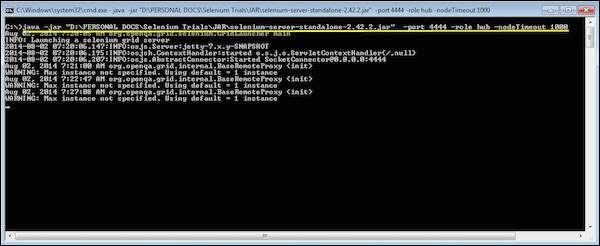
Step 2 − Start the Hub by launching the Selenium Server using the following command. Now we will use the port '4444' to start the hub.
Note − Ensure that there are no other applications that are running on port# 4444.
java -jar selenium-server-standalone-2.25.0.jar -port 4444 -role hub -nodeTimeout 1000
selenium_ide_122
Step 3 − Now open the browser and navigate to the URL http//localhost:4444 from the Hub (The system where you have executed Step#2).
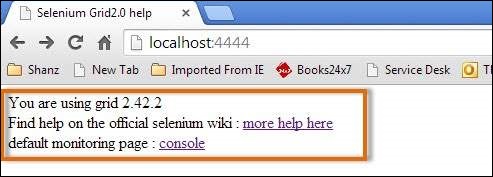
selenium_ide_123
Step 4 − Now click on the 'console' link and click 'view config'. The config of the hub would be displayed as follows. As of now, we haven't got any nodes, hence we will not be able to see the details.
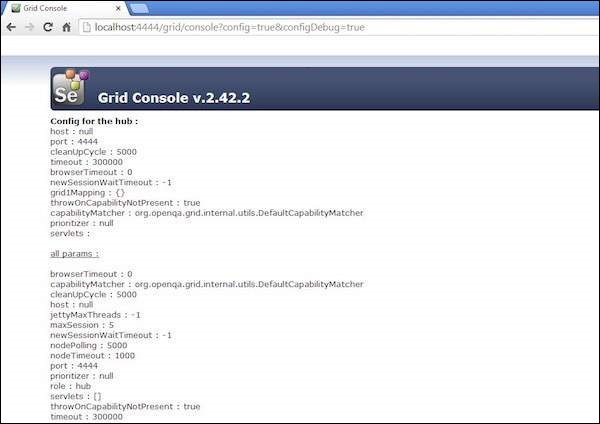
selenium_ide_124

Configuring the Nodes

Step 1 − Logon to the node (where you would like to execute the scripts) and place the 'selenium-server-standalone-2.42.2' in a folder. We need to point to the selenium-server-standalone JAR while launching the nodes.
Step 2 − Launch FireFox Node using the following below command.
java -jar D:\JAR\selenium-server-standalone-2.42.2.jar
   -role node -hub http://10.30.217.157:4444/grid/register
   -browser browserName = firefox -port 5555
Where,
D:\JAR\selenium-server-standalone-2.42.2.jar = Location of the Selenium Server Standalone Jar File(on the Node Machine)
http://10.30.217.157:4444 = IP Address of the Hub and 4444 is the port of the Hub
browserName = firefox (Parameter to specify the Browser name on Nodes)
5555 = Port on which Firefox Node would be up and running.
selenium_ide_125
Step 3 − After executing the command, come back to the Hub. Navigate to the URL - http://10.30.217.157:4444 and the Hub would now display the node attached to it.
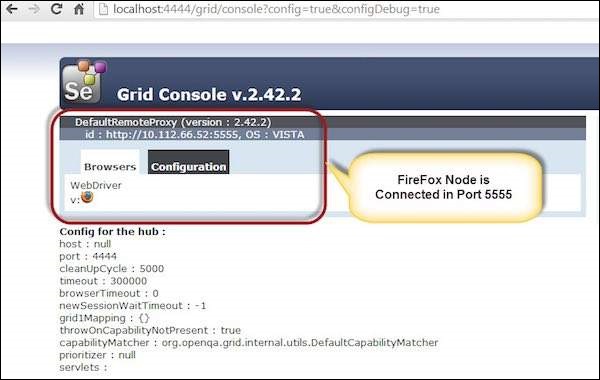
selenium_ide_126
Step 4 − Now let us launch the Internet Explorer Node. For launching the IE Node, we need to have the Internet Explorer driver downloaded on the node machine.
Step 5 − To download the Internet Explorer driver, navigate to http://docs.seleniumhq.org/download/ and download the appropriate file based on the architecture of your OS. After you have downloaded, unzip the exe file and place in it a folder which has to be referred while launching IE nodes.
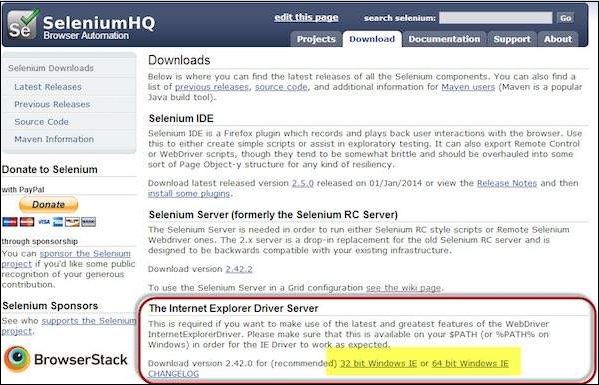
selenium_ide_131
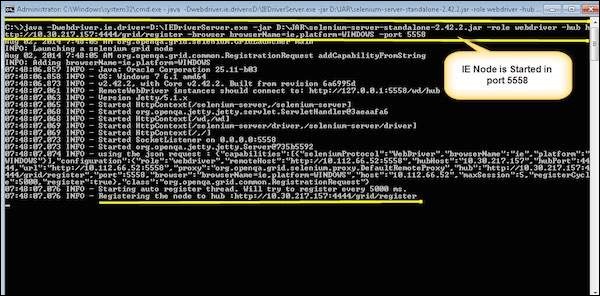
Step 6 − Launch IE using the following command.
C:\>java -Dwebdriver.ie.driver = D:\IEDriverServer.exe
   -jar D:\JAR\selenium-server-standalone-2.42.2.jar
   -role webdriver -hub http://10.30.217.157:4444/grid/register
   -browser browserName = ie,platform = WINDOWS -port 5558
Where,
D:\IEDriverServer.exe = The location of the downloaded the IE Driver(on the Node Machine)
D:\JAR\selenium-server-standalone-2.42.2.jar = Location of the Selenium Server Standalone Jar File(on the Node Machine)
http://10.30.217.157:4444 = IP Address of the Hub and 4444 is the port of the Hub
browserName = ie (Parameter to specify the Browser name on Nodes)
5558 = Port on which IE Node would be up and running.
selenium_ide_127
Step 7 − After executing the command, come back to the Hub. Navigate to the URL - http://10.30.217.157:4444 and the Hub would now display the IE node attached to it.
selenium_ide_128
Step 8 − Let us now launch Chrome Node. For launching the Chrome Node, we need to have the Chrome driver downloaded on the node machine.
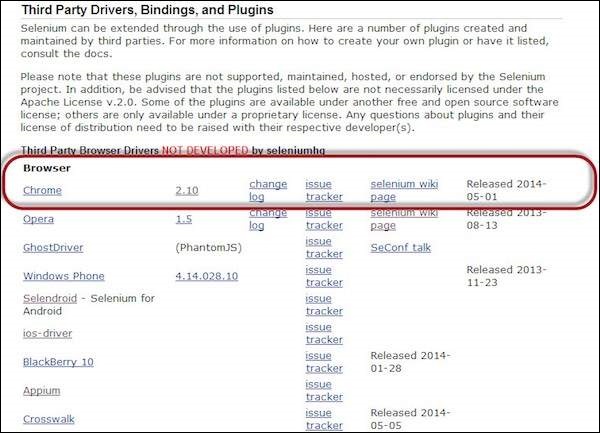
Step 9 − To download the Chrome Driver, navigate to http://docs.seleniumhq.org/download/ and then navigate to Third Party Browser Drivers area and click on the version number '2.10' as shown below.
selenium_ide_132
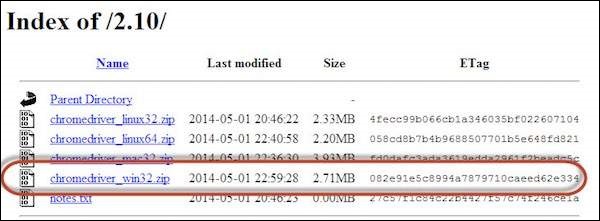
Step 10 − Download the driver based on the type of your OS. We will execute it on Windows environment, hence we will download the Windows Chrome Driver. After you have downloaded, unzip the exe file and place it in a folder which has to be referred while launching chrome nodes.
selenium_ide_133
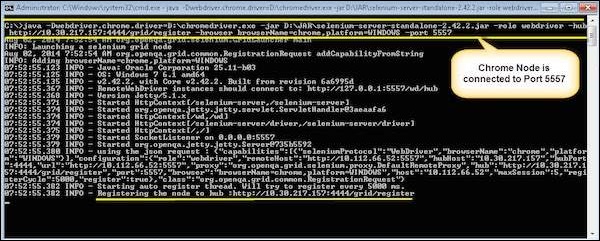
Step 11 − Launch Chrome using the following command.
C:\>java -Dwebdriver.chrome.driver = D:\chromedriver.exe 
   -jar D:\JAR\selenium-server-standalone-2.42.2.jar 
   -role webdriver -hub  http://10.30.217.157:4444/grid/register 
   -browser browserName = chrome, platform = WINDOWS -port 5557
Where,
D:\chromedriver.exe = The location of the downloaded the chrome Driver(on the Node Machine)
D:\JAR\selenium-server-standalone-2.42.2.jar = Location of the Selenium Server Standalone Jar File(on the Node Machine)
http://10.30.217.157:4444 = IP Address of the Hub and 4444 is the port of the Hub
browserName = chrome (Parameter to specify the Browser name on Nodes)
5557 = Port on which chrome Node would be up and running.
selenium_ide_129
Step 12 − After executing the command, come back to the Hub. Navigate to the URL - http://10.30.217.157:4444 and the Hub would now display the chrome node attached to it.
selenium_ide_130


Friday, January 26, 2018

Handling AJAX Call in Selenium Webdriver

What is Ajax

AJAX stands for Asynchronous JavaScript & XML, and it allows the Web page to retrieve small amounts of data from the server without reloading the entire page.
For example, when you click on submit button, JavaScript will make a request to the server, interpret the result and update the current screen without reloading the webpage.
Handling AJAX Call in Selenium Webdriver
  • An Ajax call is an asynchronous request initiated by the browser that does not directly result in a page transition. It means, if you fire an Ajax request, the user can still work on the application while the request is waiting for a response.
  • AJAX sends HTTP requests from the client to server and then process the server's response, without reloading the entire page. So when you make an AJAX call, you are not pretty sure about the time taken by the server to send you a response.
From a tester's point of view, if you are checking the content or the element to be displayed , you need to wait till you get the response. During AJAX call the data is stored in XML format and retrieved from the server.

How to handle Ajax call Using Selenium Webdriver

The biggest challenge in handling Ajax call is knowing the loading time for the web page.Since the loading of the web page will last only for a fraction of seconds, it is difficult for the tester to test such application through automation tool. For that, Selenium Webdriver has to use the wait method on this Ajax Call.
So by executing this wait command, selenium will suspend the execution of current Test Case and wait for the expected or new value. When the new value or field appears, the suspended test cases will get executed by Selenium Webdriver.
Following are the wait methods that Selenium Webdriver can use
  1. Thread.Sleep()
  • Thread.Sleep () is not a wise choice as it suspends the current thread for the specified amount of time.
  • In AJAX, you can never be sure about the exact wait time. So, your test will fail if the element won't show up within the wait time. Moreover, it increases the overhead because calling Thread.sleep(t) makes the current thread to be moved from the running queue to the waiting queue.
  • After the time 't' reached, the current thread will move from the waiting queue to the ready queue, and then it takes some time to be picked by the CPU and be running.
  1. Implicit Wait()
  • This method tells webdriver to wait if the element is not available immediately, but this wait will be in place for the entire time the browser is open. So any search for the elements on the page could take the time the implicit wait is set for.
  1. Explicit Wait()
  • Explicit wait is used to freeze the test execution till the time a particular condition is met or maximum time lapses.
  1. WebdriverWait
  • It can be used for any conditions. This can be achieved with WebDriverWait in combination with ExpectedCondition
  • The best way to wait for an element dynamically is checking for the condition every second and continuing to the next command in the script as soon as the condition is met.
But the problem with all these waits is, you have to mention the time out unit. What if the element is still not present within the time? So there is one more wait called Fluent wait.
  1. Fluent Wait
  • This is an implementation of the Wait interface having its timeout and polling interval. Each FluentWait instance determines the maximum amount of time to wait for a condition, as well as the frequency with which to check the condition.

Challenges in Handling Ajax Call in Selenium Webdriver

  • Using "pause" command for handling Ajax call is not completely reliable. Long pause time makes the test unacceptably slow and increases the Testing time. Instead, "waitforcondition" will be more helpful in testing Ajax applications.
  • It is difficult to assess the risk associated with particular Ajax applications
  • Given full freedom to developers to modify Ajax application makes the testing process challenging
  • Creating automated test request may be difficult for testing tools as such AJAX application often use different encoding or serialization technique to submit POST data.

An Example for Ajax HANDLING

import org.openqa.selenium.By;
import org.openqa.selenium.WebDriver;
import org.openqa.selenium.WebElement;
import org.openqa.selenium.chrome.ChromeDriver;
import org.openqa.selenium.support.ui.ExpectedConditions;
import org.openqa.selenium.support.ui.WebDriverWait;
import org.testng.Assert;
import org.testng.annotations.BeforeClass;
import org.testng.annotations.Test;

public class Ajaxdemo {
 
 private String URL = "http://ankitsinghal08.blogspot.in";
 
 WebDriver driver;
 WebDriverWait wait;
 
 @BeforeClass
 public void setUp() {
  System.setProperty("webdriver.chrome.driver",".\\chromedriver.exe");
  //create chrome instance
  driver = new ChromeDriver();
  driver.manage().window().maximize();
  driver.navigate().to(URL);
 }
 
 @Test
 public void test_AjaxExample() {

  By container = By.cssSelector(".container");
  wait = new WebDriverWait(driver, 5);
  wait.until(ExpectedConditions.presenceOfElementLocated(container));
  
  //Get the text before performing an ajax call
  WebElement noTextElement = driver.findElement(By.className("radiobutton"));
  String textBefore = noTextElement.getText().trim();
  
  //Click on the radio button
  driver.findElement(By.id("yes")).click();
 
  //Click on Check Button
  driver.findElement(By.id("buttoncheck")).click();
  
  /*Get the text after ajax call*/
  WebElement TextElement = driver.findElement(By.className("radiobutton"));
  wait.until(ExpectedConditions.visibilityOf(TextElement));
  String textAfter = TextElement.getText().trim();
  
  /*Verify both texts before ajax call and after ajax call text.*/
  Assert.assertNotEquals(textBefore, textAfter);
  System.out.println("Ajax Call Performed");
  
  String expectedText = "Radio button is checked and it's value is Yes";
  
  /*Verify expected text with text updated after ajax call*/
  Assert.assertEquals(textAfter, expectedText);
  driver.close();
 }
 
}

Thursday, January 25, 2018

SSL Certificate Error Handling in Selenium

What is SSL Certificate

SSL (Secure Sockets Layer) is a standard security protocol for establishing a secure connection between the server and the client which is a browser.
There are number of benefits of using SSL certificate like,
  • One can increase their users' and customer's trust in order to enhance the business' growth rapidly
  • These certificates help to secure online transactions and customers sensitive information like credit-card/debit-card data, etc.
  • Signing certificate tends to get a maximum number of downloads and good reviews from users.
SSL-secured websites begin with https:// and you can see a lock icon or green address bar if the connection is securely established.
For example, if you want to do some transaction via net banking or want to purchase a Mobile phone through e-commerce site such as Flipkart or Amazon.
What happens between the Web Browser and Server
  1. A browser tries to connect with a website secured with SSL. The browser requests the webserver to identify itself
  2. The server sends the browser a copy of its SSL certificate
  3. The browser verifies whether the SSL certificate is genuine. If so, it sends a message to the server
  4. The server sends back a digitally signed acknowledgment to start an SSL encrypted session
  5. The encrypted data is shared between the server and the browser
In doing so, you need to transmit sensitive information such as credit card numbers or login credentials and that has to transmit securely so that it cannot be hacked or intercept.
For example
  1. Type https://netbanking.hdfcbank.com/netbanking/ .
  2. Hit Enter.
  3. You will see a green address bar in the browser as below :-
SSL Certificate Error Handling in Selenium

How Does the SSL Certificate Create a Secure Connection

SSL Certificate Error Handling in Selenium
  1. Browser sends HTTPS request to the server.
  2. Now Server must provide some identification to Browser to prove that it is trusted. This can be done by sending a copy of its SSL certificate to the browser.
  3. Each Browser has its own list of Trusted CA's. Browser checks the certificate root against its list of trusted CAs and that the certificate is unexpired, unrevoked, and that the common name is valid for the website that it is connecting to.
  4. If the browser trusts the certificate, an encrypted session is created between the server and the browser.
  5. Server and Browser can send encrypted messages

Types of SSL Certificates

Browser and the server use SSL Certificate mechanism to be able to establish a secure connection. This connection involves verification of three types of certificates.
  • Root
  • Intermediate
  • Server Certificate
Process of getting SSL Certificate
The process of getting SSL certificate includes below steps:-
  1. First, you must create CSR (create a Certificate Signing Request) request.
  2. CSR request creates CSR data file, which is sent to SSL certificate issuer known as CA (Certificate Authority).
  3. The CA uses the CSR data files to create SSL certificate for your server.
  4. After receiving the SSL certificate, you have to install it on your server.
  5. An intermediate certificate is also needed to be installed which ties yours SSL certificate with CA's root certificate.
The below image represent all the three certificate- Root, Intermediate, and Server Certificate.
SSL Certificate Error Handling in Selenium

How SSL certificates are verified

SSL works through a combination of programs and encryption/decryption routine that exist on the web server computer and web server browser.
SSL certificate basically contains below information.
  1. Subject which is the identity of the website owner.
  2. Validity information- a public and a private key.
The Private and public key are two uniquely related cryptographic keys (numbers). Whatever is encrypted by a public key may only be decrypted by a private key.
SSL Certificate Error Handling in Selenium
When a secure connection is not established between the server and client due to the certificate, following SSL certificate error will be manifested.

Types of SSL Certificate Error

Suppose you type some https request in the browser and get a message such as "This connection is Untrusted" or the "The site's security certificate is not trusted" depending upon the browser you are using. Then such error is subject to SSL certificate error.
Now, if the browser is unable to establish a secured connection with the requested certificate, then the browser will throw "Untrusted Connection" exception as below and ask the user to take appropriate action.
The types of error you likely to see due to certificate in different browsers may be somewhat like this
  1. FireFox - This connection is untrusted
  1. Google Chrome -This site security is not trusted
  1. Internet Explorer ( IE) - This security certificate presented by this website was not trusted by a trusted certificate authority (CA)
SSL Certificate Error Handling in Selenium

How to handle SSL Certificate Error using Selenium Webdriver

Suppose we have written some test scripts and while executing the script, we caught in the situation as "Untrusted Connection" above then how do we handle the exception purely through automation.
In such case, we have to adjust our script in such a way that it will take care of SSL Exception by itself.
The scripts need to be modified according to the type of browser instance we are using. These when desired capabilities comes in picture.
Desired Capabilities is used to configure the driver instance of Selenium Webdriver. Through Desired Capabilities, one can configure all driver instance like ChromeDriver, FirefoxDriver, and Internet Explorer.
As of now we don't have any specific URL to create the above scenario, but I am providing steps that we can add in the Selenium Script to handle the above situation "Untrusted Connection."

SSL Certificate Error Handling in Firefox

For handling SSL certificate error in Firefox, we need to use desired capabilities of Selenium Webdriver and follow the following steps.
Step 1): First we need to create a new firefox profile say "myProfile". You can refer google to learn "How to create" firefox profile. It is simple and easy.
Step 2): Now access myProfile in the script as below and create the FirefoxProfile object.
ProfilesIni prof = new ProfilesIni()    
FirefoxProfile ffProfile= prof.getProfile ("myProfile")
Step 3): Now we need to set "setAcceptUntrustedCertificates" and "setAssumeUntrustedCertificateIssuer" properties in the Fire Fox profile.
ffProfile.setAcceptUntrustedCertificates(true) 
ffProfile.setAssumeUntrustedCertificateIssuer(false)

Step 4): Now use the FireFox profile in the FireFox driver object.
WebDriver driver = new FirefoxDriver (ffProfile)   
Note: "setAcceptUntrustedCertificates" and "setAssumeUntrustedCertificateIssuer" are capabilities to handle the certificate errors in web browsers.

SSL Certificate Error Handling in Chrome

For handling SSL error in Chrome, we need to use desired capabilities of Selenium Webdriver. The below code will help to accept all the SSL certificate in chrome, and the user will not receive any SSL certificate related error using this code.
We need to create instance of DesiredCapabilities class as below:-
DesiredCapabilities handlSSLErr = DesiredCapabilities.chrome ()       
handlSSLErr.setCapability (CapabilityType.ACCEPT_SSL_CERTS, true)
WebDriver driver = new ChromeDriver (handlSSLErr);

SSL Certificate Error Handling in IE

Unlike handling SSL certificates in Chrome browser and Firefox, in IE, you may have to handle it using javascript.
To handle SSL certificate in IE, you can handle this situation in two ways,
  1. In this, you will click the link "Continue to this website (not recommended)". In the following we will see how to handle SSL error in IE.
Observe SSL certificate error in IE browser you will find "Continue to this website (not recommended)" link.This link has ID "override link".You can view the ID in HTML mode using F12.
SSL Certificate Error Handling in Selenium
Click on the link using driver.navigate() method with JavaScript as below :-
driver.navigate ().to ("javascript:document.getElementById('overridelink').click()");
  1. The second method is quite similar to chrome SSL Handling code
DesiredCapabilities capabilities = new DesiredCapabilities();
capabilities.setCapability(CapabilityType.ACCEPT_SSL_CERTS, true);
System.setProperty("webdriver.ie.driver","IEDriverServer.exe");
WebDriver driver = new InternetExplorerDriver(capabilities);
The above code will help to handle SSL certificate error in IE.

Wednesday, January 17, 2018

Executing Parallel Tests in TestNG

TestNG allows the tests to run in parallel or multi-threaded mode. Parallel test are helpfull for reduction in test execution time.TestNG use the concept of multi-threading from Java. In the configuration file, the parallel attribute on the tag us been used for the parallel execution using the testng.xml file. Example:
<suite name="Suite" parallel="methods" thread-count="2" configfailurepolicy="continue">
Parallel attribute take multiple values, Below are the valid values:
  • parallel= methods : Run all your test methods in separate threads.
  • parallel= tests : Run all the methods in the same tag in the same thread, but each tag will be in a separate thread.
  • parallel= classes : Run each class in a separate thread but all the methods in the same class in the same thread.
  • parallel= instances : Run all the methods in the same instance in the same thread.
thread-count attribute value allows you to specify how many threads should be allocated for the execution.
configfailurepolicy attribute value as continue allows Test to continue running after Failures.
Lets create an Example for all the values for parallel attribute type.

1. Test methods in parallel:

To Run Test methods parallel each test method will run in a separate single thread, So we will print the Thread ID for the particular Test and which should be different.
package com.tutorial.testng.parallel;

import org.testng.annotations.Test;

public class MethodInParallel {
 @Test()
 public void firstTestMethod() {
  System.out.println("First test method, ThreadID:" + Thread.currentThread().getId());
 }

 @Test()
 public void secondTestMethod() {
  System.out.println("Second test method, ThreadID:" + Thread.currentThread().getId());
 }
}
xml version="1.0" encoding="UTF-8"?>
http://testng.org/testng-1.0.dtd
"> <suite name="Suite" parallel="methods" thread-count="2" > <test name="Test" group-by-instances="true"> <classes> <class name="com.tutorial.testng.parallel.MethodInParallel" /> </classes> </test> </suite>

Output:

After running the testng.xml file we can see the output with both the test methods in different ThreadID as 11 and 10, which means both test ran in parallel Thread.
Second test method, ThreadID:11
First test method, ThreadID:10
===============================================
Suite
Total tests run: 2, Failures: 0, Skips: 0
===============================================

2. Test Class in parallel:

To Run Test Class parallel meaning each Class will be executed in a different Thread and the same thread is used for Test method Execution. For this Example We need to Create 2 Class which will Run in Parallel.
package com.tutorial.testng.parallel;

import org.testng.annotations.Test;

public class ClassInParallelOne {
 @Test()
 public void firstTestMethod() {
 System.out.println("First test method from Class One, ThreadID:" + Thread.currentThread().getId());
 }

 @Test()
 public void secondTestMethod() {
 System.out.println("Second test method from Class One, ThreadID:" + Thread.currentThread().getId());
 }
}
package com.tutorial.testng.parallel;

import org.testng.annotations.Test;

public class ClassInParallelTwo {
 @Test()
 public void firstTestMethod() {
 System.out.println("First test method from Class Two, ThreadID:" + Thread.currentThread().getId());
 }

 @Test()
 public void secondTestMethod() {
 System.out.println("Second test method from Class Two, ThreadID:" + Thread.currentThread().getId());
 }
}
xml version="1.0" encoding="UTF-8"?>
http://testng.org/testng-1.0.dtd
"> <suite name="Suite" parallel="classes" thread-count="2" > <test name="Test" group-by-instances="true"> <classes> <class name="com.tutorial.testng.parallel.ClassInParallelOne" /> <class name="com.tutorial.testng.parallel.ClassInParallelTwo" /> </classes> </test> </suite>

Output:

After running the testng.xml file we can see the output as Class One is using ThreadID:10 and Class Two is using ThreadID:11. Both the Test methods from Class Ran in the Same Thread.
First test method from Class One, ThreadID:10
Second test method from Class One, ThreadID:10

First test method from Class Two, ThreadID:11
Second test method from Class Two, ThreadID:11

===============================================
Suite
Total tests run: 4, Failures: 0, Skips: 0
===============================================

3. Tests Tag Inside Suite in parallel:

Run all the methods in the same tag in the same thread, but each tag will be in a separate thread. In this Example we will see executing each test inside a suite in parallel, each test that is part of the test suite execution will be executed in its own separate respective thread.
package com.tutorial.testng.parallel;

import org.testng.annotations.Test;

public class TestTagInParallel {
 @Test()
 public void firstTestMethod() {
  System.out.println("First test method, ThreadID:" + Thread.currentThread().getId());
 }

 @Test()
 public void secondTestMethod() {
  System.out.println("Second test method, ThreadID:" + Thread.currentThread().getId());
 }
}
xml version="1.0" encoding="UTF-8"?>
http://testng.org/testng-1.0.dtd
"> <suite name="Suite" parallel="tests" thread-count="2" > <test name="Test-One" group-by-instances="true"> <classes> <class name="com.tutorial.testng.parallel.TestTagInParallel" /> </classes> </test> <test name="Test-Two" group-by-instances="true"> <classes> <class name="com.tutorial.testng.parallel.TestTagInParallel" /> </classes> </test> </suite>

Output:

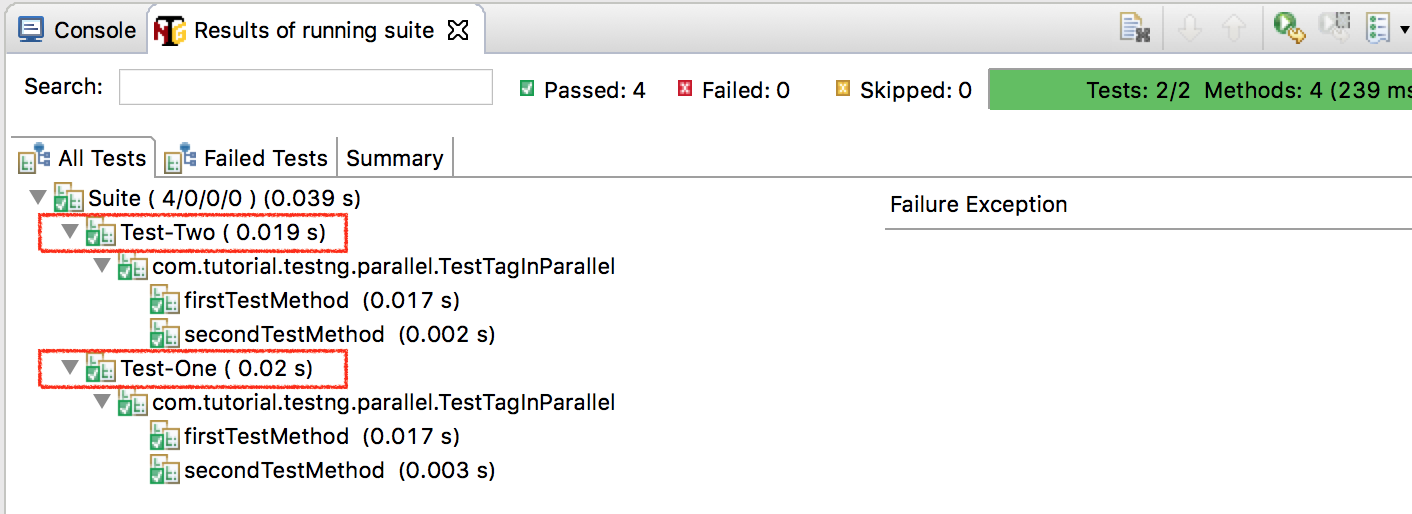
After running the testng.xml file we can see the output as Test Test-One is using ThreadID:10 and Test Test-Two is using ThreadID:11. All the Class Inside the Test Tag will Run under same Thread.
First test method, ThreadID:11
Second test method, ThreadID:11
First test method, ThreadID:10
Second test method, ThreadID:10
===============================================
Suite
Total tests run: 4, Failures: 0, Skips: 0
===============================================
test-tag-parallel-run-result-testng