Ankit_Add

Tuesday, December 5, 2017

What is RemoteWebDriver in Selenium WebDriver?

What is RemoteWebDriver?

RemoteWebDriver in Selenium Webdriver implements each of the JSONWireProtocol commands and maps them into an action that can be performed on a remote machine.
RemoteWebDriver is a Class in the package org.openqa.selenium.remote inside the Client Project of WebDiver. RemoteWebDriver.class implements multiple interface like WebDriver(Yes WebDriver is an Interface not a Class as I have seen many people confused about this information), FindsById, FindsByClassName, FindsByLinkText etc.
package org.openqa.selenium.remote;
public class RemoteWebDriver implements WebDriver, JavascriptExecutor,
      FindsById, FindsByClassName, FindsByLinkText, FindsByName,
      FindsByCssSelector, FindsByTagName, FindsByXPath,
      HasInputDevices, HasCapabilities, Interactive, TakesScreenshot 
JavaDoc for the RemoteWebdriver explains all the details about the Class and its Methods,SubClasses and Interface implement in gitHub Url.
Now the question is who use this RemoteWebdriver.class?
All the Browser Driver Class are the child class of RemoteDriver means they are extending the RemoteWebDriver.Class. Few examples of the drivers are below..
public class ChromeDriver extends RemoteWebDriver
    implements LocationContext, WebStorage, HasTouchScreen, NetworkConnection {
public class FirefoxDriver extends RemoteWebDriver {
public class InternetExplorerDriver extends RemoteWebDriver {
So whenever in our test class we create a Driver instance by using the line 
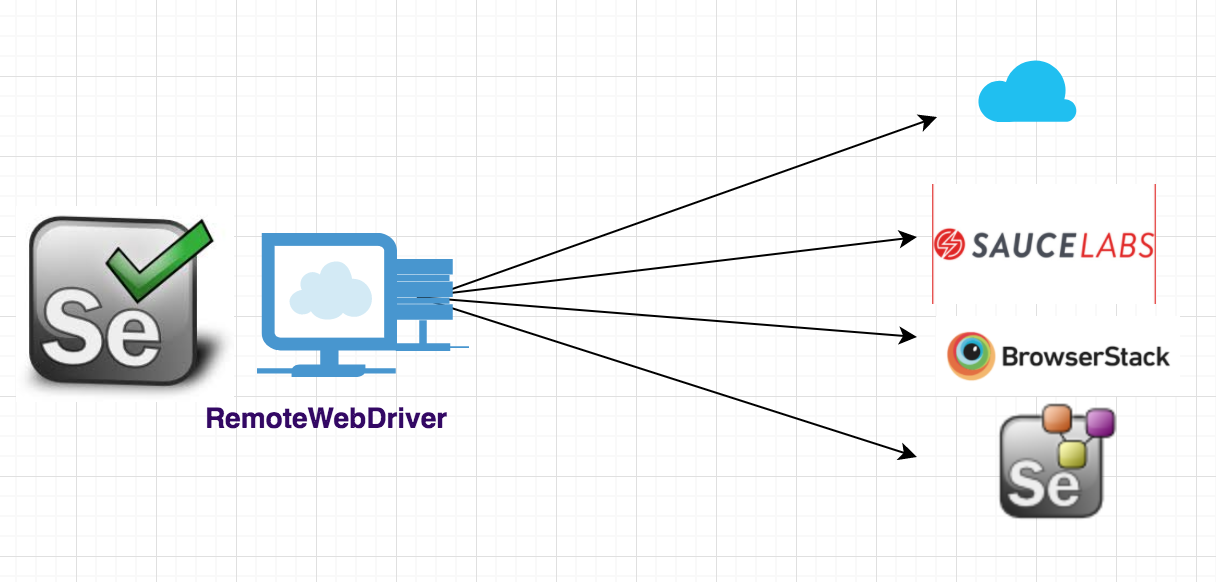
WebDriver driver = new ChromeDriver(); we are always creating an instance of the RemoteDriver Class automatically.

Can we use the RemoteWebDriver class directly in our Test?

Yes we can directly create an instance of the RemoteWebDriver Class as well because drivers are local implementation that controls a browser running on the local machine, If we want to Run our Test Cases not only in our local browsers but on the distributed systems like cloud application Sauce Lab or BrowserStack or Selenium Grid. We must use RemoteWebDriver class instance and pass the proper DesiredCapabilities like:
public void createChromeDriverForRemote(){
 WebDriver driver = new RemoteWebDriver(remoteUrl,
          DesiredCapabilities.chrome());
    } 
remote-webdriver-in-cloud

How RemoteWebDriver Works?

Let’s understand what are the methods involved and class RemoteWebDriver use to perform any action from our test programme. I am going to use ChromeDriver here for the explanation and will be trying to explain step by step.
System.setProperty("webdriver.chrome.driver", "/path/to/chromedriver");
DesiredCapabilities desiredCapabilities = DesiredCapabilities.chrome();
WebDriver driver = new RemoteWebDriver(new URL(url), desiredCapabilities);
driver.get("http://www.google.com");
When we create an instance of the RemoteWebDriver by passing the URL and DesiredCapabilities object using the following line
WebDriver driver = new RemoteWebDriver(new URL(url), desiredCapabilities);
Constructor method of RemoteWebDriver class is invoked and create a session for your test scripts. There are multiple methods call inside and you receive the sessionId for you Test. RemoteWebDriver Class use two another important class: DriverCommandExecutor.class and HttpCommandExecutor.class
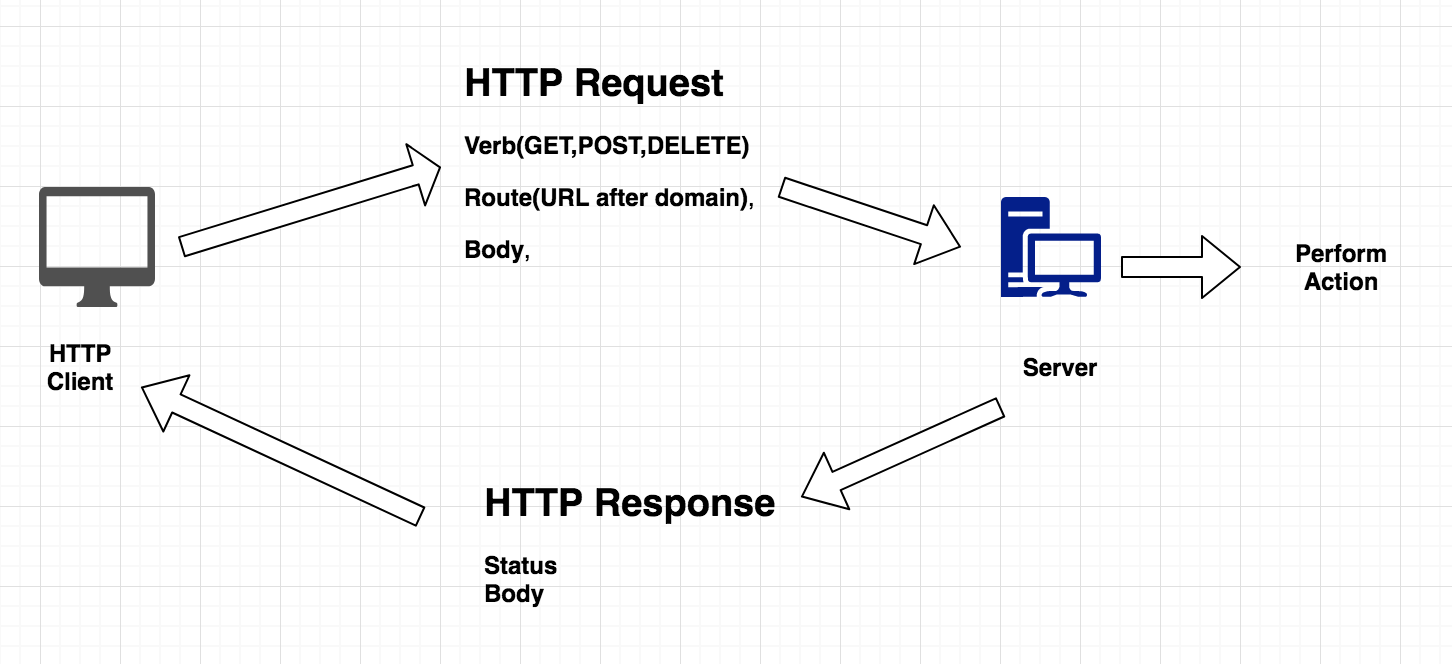
HttpCommandExecutor.class has a very important method as execute which is used to execute all the WebDriver commands and initializing the HttpClient which is used to send and receive the HTTP requests between server and client.
public Response execute(Command command) throws IOException {
    ...........
}
execute-command-in-HttpCommandExecuter
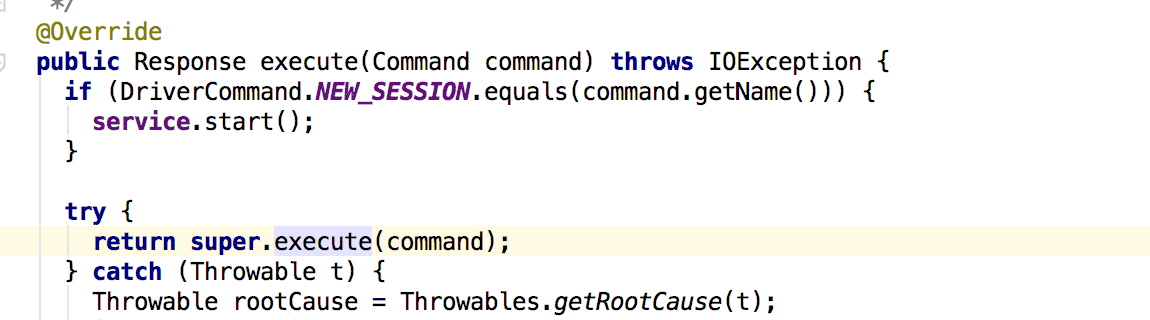
So every command like Get or findElement goes through this execute method and send to the server and return the Response Class object. All the details about the methods and class details are explained in the selenium API javaDocs. I recommend everyone to build webdriver on there local machines and try to look into the classes and methods.

Monday, December 4, 2017

What is Selenium WebDriver?

Selenium WebDriver is an open source application for driving browsers for automation testing. Using WebDriver libraries you can drive the browser and perform actions like Click, Open URL, Enter Text, Clear Text, Take Screenshot of browser and many more actions. WebDriver works on a very simple principle of Client Server architecture. The communication between the server and client is through HTTP request and response.
WebDriver uses JSON wire protocol works on RESTful Web Services over HTTP. In simple terms, WebDriver uses JSON wire protocol for communication between client libraries like Java, PHP, C#, and servers which are different drivers like ChromeDriver, FirefoxDriver etc. WebDriver is nothing but sending request and response.

What is JSON Wire protocol?

JSON (JavaScript Object Notation) is a lightweight format for data exchange between client and server. Applications use JSON objects to send and receive data between each other in the web world. JSON data structure is industry standard and can be used for sending and receiving data as Key & Value pair. Some people say its a very nice alternative for XML. We can save JSON files as .json extension.

How JSON looks like?

A simple json file looks like below and there are many online editors which can be used to edit and verify JSON structure.
{
 "Student":{
   "FirstName":"Pawan",
   "LastName":"Garia",
   "IdNumber":"12345",
   "City" : "New Delhi",
   "EmailID" : "email@gmail.com" }
}

How WebDriver interacts with Browsers?

WebDriver does not directly interact with the browser. WebDriver creates a request and send the request to the proxy driver server which is running in between the Client and Browser. For example, to run WebDriver script on Chrome Browser we need to first start the ChromeDriver server and then driver launches the Chrome Browser and starts listening on a particular PORT like localhost:12570. Listening on the PORT is nothing but accepting the HTTP request methods which can be GET, POST, DELETE etc. which are HTTP standard methods.Client server WebDriver

What is next?

In the next articles, I will be covering interaction between the Client, Driver and Browser with examples and depth. I am going to explain how a particular action get performed on browser using ChromeDriver.

Understanding the Architecture of Selenium WebDriver

Selenium WebDriver provides a programming interface for driving the browser for automation testing. You can find the introduction of WebDriver in my other article. This article is more about the architecture and understanding how selenium WebDriver uses JSON Wire Protocol.
JSON Wire Protocol is an abstract specification of how automation behavior like clicking or typing or whatever you actually want to do with your automation script is mapped to selenium or appium or HTTP requests and response.

Why JSON Wire Protocol used in first place?

To implement a client-server architecture which can give us the following benefits.
  • You write test in any programming language.
  • You can perform or run test on cloud services like SauceLabsBrowserStack or Selenium Grid setup.
  • You are not bound to run test only on the local machine.
  • Different Drivers(FirefoxDriver, ChromeDriver) can be crated for browsers and separate implementation by using the same standards.
So client-server implementation requires a standard set of the specification beforehand so that Server and Client should be in sync with each other in term of what is coming and going on request and response. It’s something like a language of communication with each other. So we need some common specification to solve this kind of requirement and the solution is HTTP.

Why HTTP is the solution?

HTTP is a standard for web and can be a good base for the specification. Every programming language has a good HTTP libraries which can be used for creating client and server for request and response calls.

How JSON Wire protocol works with HTTP?

HTTP request and response are generally made of verbs, route, body and response codewhich I am explaining here in details:
HTTP Verbs:
GET: Retrieve some information from server for example: getText, getTitle
POST: Make something happen for example: startSession, findElement, Click
DELETE: Delete some resource for example: deleteSession
HTTP Route:
There are many routes in JSON Wire Protocol used by WebDriver which you can check out here. Few examples:
GET   /status

POST  /session

GET   /Session 
client server request response in webdriver
HTTP Response Code:
HTTP status codes are not specific enough for all the kind of things might happen in Selenium WebDriver testing session. So for a specific case like NoSuchElement or Errors, we have a status code so that client can give a particular and useful information back to the user. There are many response codes defined in WebDriver which you can find herein details but here are some examples:
0:   Success
7:   NoSuchElement
11:  ElementNotVisible
200: Everything OK
500: Something is wrong
404: Resource not there 
501: Valid request but action not done by the server
HTTP Request and Response Body:
Everything is JSON in request and response body. JSON is used for data transfer between client and server.
JSON Wire Protocol Request has route and body described in JSON like:
POST /session
{"desiredCapabilities" : {"browserName" : "chrome"}}
JSON Wire Protocol Response has status code and value in body like a successfull findElement request will give you the following response:
{"status" : 0, "value" : {"element" : "123422"}}

How Test work with HTTP and JSON Wire Protocol?

HTTP is a stateless protocol which means multiple requests are not associated with each other and server is not required to track the state of a particular client’s previous request. Your test might be getting an Element in one request and clicking on the same Element in some another request, So Client and Server should share session, element, frame etc. with each other in subsequent requests. So the server assigns a unique ID to these Items like session and Element and then shares them with Client. The client can decide in the request like what needs to be done on the particular ID like click on an element.
Client makes a findElement call to server and gets the response:
  Request:  POST  /session/::sessionId/element
  Response: {“status”:0, “value”:{“element":”elementID”}}
Now client knows the elementID from the previous request’s response and sends a click request with elementID.
   Request:  POST  /session/::sessionId/element/::elementID/click
   Response: {“status” : 0}

What WebDriver is doing in JSON Wire protocol ?

Selenium WebDriver is a client which is giving an interface to write test in programming languages like Java or Python or many other languages in the market. Server doesn’t care or know about what language you are using for writing your tests because it only cares about the correct protocol which is JSON Wire protocol. So you can also make your own Selenium Webdriver in your choice of programming language. :)

Tuesday, November 28, 2017

Running a Selenium Java project using Jenkins and Maven

jenkins-logo
Jenkins is a multi-purpose Continuous Integration server.

In this post, we will install Jenkins on a Linux machine (Ubuntu / Debian Distro) and we will configure it to run a selenium project. The same principal applies to Windows operating system.

How to run a selenium java project using Jenkins on Linux?
The steps are as follows:
1. Install Jenkins on Linux machine
2. Make your Selenium Java project into a Maven Selenium Java project
3. Configure Jenkins to run Selenium project

Step 1.  Install Jenkins on Linux machine
The simple way to install Jenkins on Linux (an ubuntu machine) is installing it from commandline (terminal in Ubuntu):


wget -q -O - https://jenkins-ci.org/debian/jenkins-ci.org.key | sudo apt-key add -
sudo sh -c 'echo deb http://pkg.jenkins-ci.org/debian binary/ > /etc/apt/sources.list.d/jenkins.list'
sudo apt-get update
sudo apt-get install jenkins
view rawinstall-jenkins hosted with ❤ by GitHub
After you install it this way you can manage Jenkins via the terminal as follows:

# To stop Jenkins service
sudo service jenkins stop
# To start Jenkins service
sudo service jenkins start
# To restart jenkins service
sudo service jenkins restart
view rawmanaging-jenkins hosted with ❤ by GitHub


You can visit http://localhost:8080 to see whether you can access Jenkins via the web browser

Step 2 . Make your Selenium Java project into a Maven Selenium Java project
I have created my sample Selenium Google Search project which was implemented in Java using TestNG into a Maven project

A sample project is here : Sample Selenium Java project which uses maven

Step 3. Configure Jenkins to run Selenium project
This step has further steps:
1.  Install Java  and Maven so that Jenkins can use them

Visit http://localhost:8080/configure

java-maven-installation-jenkins
Install Java and Maven for Jenkins(click to enlarge)
If you choose the install automatically checkbox, Jenkins installs the required Java and Maven installations for you.

2. Tell Jenkins where is your project
In Jenkins, create a new project  and select Maven Project.

After this step, you need to tell Jenkins where is your project on your local machine.
Before this step make sure you have given suitable rights to your root project directory using chmod command.

If you are using a custom workplace, you will need to Configure Jenkins as shown here.

3. Run your project using the build now option in Jenkins

You will get some issues as follows:
1. Cannot access pom files  - This issue is due to lack of  proper access rights

2. Cannot open display (error while running jenkins on linux machine)

How to solve Cannot open display in jenkins/hudson in Linux machine?
The solution is simple.

Open jenkins shell script located at: /etc/init.d/jenkins 

Add the following lines as follows before PATH variable:

##Hack by Sundeep##
/usr/bin/X :0 vt7 -ac
export DISPLAY=:0
xhost +

How to upgrade your website or blog from http to https for free

Cloudfare SSL


Cloudfare offers a free SSL certificate  that enables a website publisher to host content using the https protocol on a website.

It also allows a blogger blog which has a custom domain to upgrade to https.

What are the advantages of https?

  1. Websites are more secure
  2. Google assigns a higher ranking to https websites
  3. Websites are faster


How to install  Cloudfare certificates?
In order to install the Cloudfare SSL certificate so that all content is served via https, a website owner needs to change the DNS nameservers to that provided by Cloudfare as below:

Cloudfare NameServers

The best thing is that existing MX, A, TXT records are backed up and nothing gets deleted.

You then need to enable SSL in the Crypto tab in Cloudflare console:

Enable SSL in Cloudflare


As soon as you enable this option, the website will be served via HTTPS protocol.  Users will see a lock option in the address bar as below:


You can easily force all mixed content to be served via https using the below setting:

force https setting

The advantage is that if a website owner has uploaded an image which was served by http and is now available on https, Cloudflare detects this and automatically serves such content via https.

Saturday, September 17, 2016

How to use Google Contributor on your website or blog to earn money?

google-contributor
What is Google Contributor?Google recently announced Google Contributor, that allows website and blogger owners to ask visitors a monthly fee of ($2,$5 or $10) to see fewer adds on the websites.

This is a win-win for both visitors and website publishers.


How to setup Google Contributor on your website or blog to earn money?
The steps to enable Google Contributor are as follows:
1. Choose a proper Google Contributor Image

You can select the images from the official Google Contributor page.

 Download the same image which you feel is suitable for your website.

Tip: Let Google do the hosting for these images, click on "View Image" in a browser and select the URL for the image

2. Now you link the downloaded image to Google Contributor

In this step, if the website owner clicks the image, the visitor is asked an amount to see fewer advertisements.

https://www.google.com/contributor/welcome/?utm_source=publisher&utm_medium=banner&utm_campaign=your_pub_ID

So the above link will be as shown here.
The resulting image will be as shown below:


You can also add Google Badge as shown here Google Badge Link. Just add your Google Publisher code.

What is Google Publisher id?
https://support.google.com/adsense/answer/105516?hl=en